How to Guide: Fitting a Handle to a Knife Blade
The importance of health and safety is something that is much maligned by many across the country, thanks to the by-the-book rigidity that it is often enforced with. While in some cases, accusations that it has become over the top can possibly be justified, there are a few tasks that require the utmost care and consideration. One of those tasks is the fitting of a suitable handle to a knife blade.
It’s unquestionable that the knife is one of the pillars of successful bushcraft. Without having a sufficient blade with you, even the simplest of tasks will pose potential stumbling blocks. The things you normally take for granted when out amongst nature will soon become tiresome and will often, in many cases, cause the atmosphere of the outing to be tarnished.
Ensuring the blade is comfortable to use is also integral to the success of any bushcraft enthusiast. Without careful attention applied to the handle of a blade, it could result in unwanted movement and therefore damage the overall effect of the knife itself. Poor grip can also lead to blistering of the hands, something that would hinder even the most seasoned woodland expert. In light of these facts, here at Greenman Bushcraft we have compiled a handy guide, guaranteeing that you are prepared before your next forage into the wilderness.
1. Safety First
As we have mentioned, handling a blade of any calibre requires full concentration. Even the smallest of knives can cause serious damage, so ensure you have no distractions before carrying out the process. The best measures against any unfortunate incidents are often the simplest ones. The application of adhesive tape, wound round the blade to neutralise any danger, is the most effective way of guaranteeing the handle fitting process remains a safe one.
Now, the real work begins.
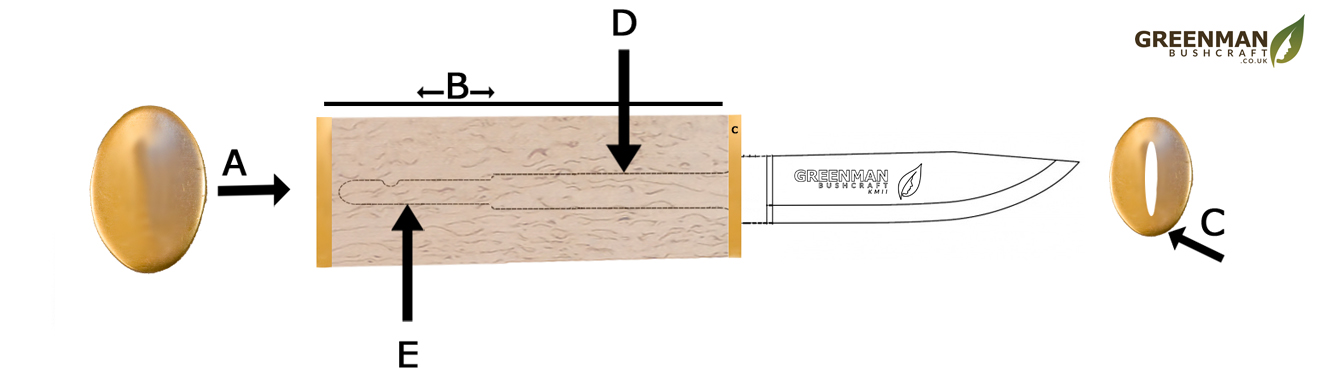
2. Find a piece of hardwood (an inside tip is that, for the best results, it is preferable that the piece has colour to it). Once located, cut the wood 38mm by 25mm, or the equivalent to 1.5 inches by 1 inch. Length wise, the wood should be slightly longer than your fist as any smaller will make it extremely difficult to manoeuvre.
3. Hold the wood in a vice, and drill a hole that measures the diameter of the widest part of the ‘D’ section on the diagram.
4. Following this, the drill is required to make a slightly larger incision, this time as wide as the tang on the ‘E’ section, measuring the length of ‘E’ plus an additional 6mm, or 1.25 inches.
5. The next step requires a further piece of hardwood, Antler or brass, providing you feel it is dense enough. Should you have reservations, a piece of bone or horn will provide an adequate alternative. Once you’ve chosen your material, cut it to measure 6mm thick and drill a central hole identical to the one on ‘E’ (see previous step). This – labelled as ‘C’ on the diagram – needs to be glued to section ‘B’ with the holes matched up. Use resin glue for the best effect.
6. When part ‘C’ has set, you’ll need a padsaw to saw a groove from the central hole. This is simply to ensure the blade is recessed when the blade is inserted into the handle. The padsaw will allow you to perform this step with great precision.
7. The hole will then need to be filled with the resin glue used in Step 5. Once done, the tang needs to be threaded through carefully, and any surplus resin residue needs to be removed swiftly. Then, apply pressure with a vice or similar clamping mechanism to ensure the blade is held firmly to the handle. Leave the glue to set completely before continuing.
8. Occasionally, you may experience a slight protrusion from the tang. Should this be the case, don’t worry – it’s no cause for concern. To rectify, simply file it off and glue onto section ‘A’ as a decorative feature. It may sound unorthodox, but you’ll have to trust us on this one.
9. After the glue has completely set, it is time to personalise the knife to your requirements. Shape the handle to fit your own hand using a rasp and sandpaper and finish with linseed oil for the best aesthetic effect.
10. Remove the adhesive tape, and you’re all done. You should be left with a handle distinctly designed for you, complete with a powerful and safe grip for optimum results when using the knife. One feature we believe best to leave out is a guard, commonly used to stop the handle from drifting down onto the blade – this is particularly the case when performing forward motions with the knife. The guard, however, would inhibit the knife’s use when carving, making the process a testing one.
If you'd like to print a high-res image of the picture, please vist our PDF Downloads page.

COMMENTS
LEAVE YOUR OWN COMMENT