Anatomy of a Bushcraft Knife
The bushcraft knife is the most important tool the bushcafter and survivalist owns. These cutting tools come in many different shapes, sizes and variations, but there are a few fundamentals that are the same with each high-quality and well-made bushcraft knife.
This short guide aims to explain what each part of the knife is known by, and what the functions are.
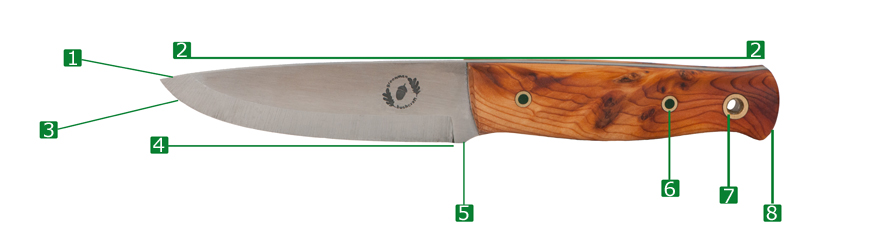
Anatomy of the Bushcraft and Survival Knife
1) The Point – the point of the bushcraft knife comes into play mostly when carving fine details onto wooden objects, piercing and skinning.
2) The Spine/Tang – the spine of the knife is essentially the back of the blade, but the portion of this, and the lower part of the blade which extends into the handle is known as the ‘tang’ which gives the knife strength and balance.
3) Cutting edge – this is the part of the bushcraft knife that is sharp and usually fine in most bushcraft knives, although survival-type knives often incorporate a serrated section closer to the handle which is used for tasks such as cutting ropes. For details on the bevel/grind of the blade please see our useful guide on choosing a survial knife.
4) Belly – the belly of the knife is underside of the full-length of the blade, including the non-sharpened element.
5) Choil –this is usually the part of the knife that very few seem to know the name of. The choil to some serves little or no purpose other than producing a more aesthetically pleasing and more balanced appearance to a knife. The choil is sometimes somewhat pronounced and cumbersome, and they usually form part of the finger-guard (when present). You’ll see from Our Greenman Bushcraft knife that the choil has been greatly minimised to allow for a smoother user experience as they can get in the way!
6) Pins/rivets – these quite simply hold the handle onto the tang of the knife and are often used to incorporate the logo of the knife maker, or filled with coloured resins to give the survival knife personality
7) Lanyard Hole – the lanyard hold is not essential, but can be used to pass cordage through for two reasons. Firstly, the lanyard can be placed around your wrist is there is a chance of dropping the knife when being used, and secondly, with a longer piece of cord to wear around ones neck for easy access when not wearing a belt for example.
8) Butt – the butt of the knife may well be named the ‘pommel’ if it has a metal or in some cases plastic cap, which in some survival knives can be used in place of a hammer (we don’t recommend this). The pommel may also be used to balance a knife.
You will notice that the Greenman Bushcraft Knife above lacks a finger guard. Finger guards are a common feature on many bushcraft knives, but like the choil, they can get in the way. An experienced user of bushcraft knives is less likely to require a pronounced finger guard and we’ve purposely left this out from the Greenman Bushcraft Knife, using the shape of the ‘tang’ as it meets the ‘choil’ to form a natural resting place for the index finger, allowing for excellent carving ability without hindrance.
COMMENTS
LEAVE YOUR OWN COMMENT